
For removing bitnami banner permanently from your bitnami wordpress website, You have to follow three steps
- Open SSH Server
- Enter Command Which Is Given Below
- Restart Apache Server
1.Open SSH Server
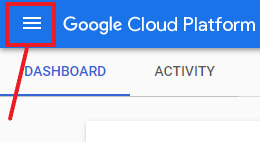
For opening SSH server you have to login to your google cloud account. And go to the home page
At the left corner side there is a menu bar, open that menu bar
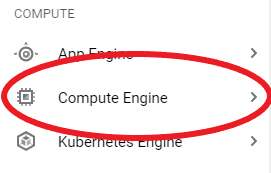
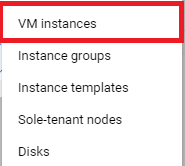
After opening menu bar go to the compute engine and open VM instances
After opening VM instances click on the SSH button
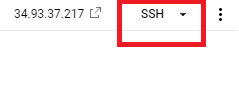
After clicking on SSH button new window will open, then at that window you have to enter the command which is given below.
2.Enter Command Which Is Given Below
In the SSH window paste the command which is given below and then press enter
Command:-sudo /opt/bitnami/apps/wordpress/bnconfig –disable_banner 1
After pressing enter you have to enter the one another command for restarting the apache server.
3.Restart Apache Server
For restarting the apache server you have to enter the command which is given below and then press enter
Command:-sudo /opt/bitnami/ctlscript.sh restart apache
After restarting apache server you will not longer see the bitnami banner at the right corner of your wordpress website.
Temporary Method
If you want to disable the bitnami banner by using CSS code then you have to enter the following code in your WordPress custom CSS.
Code:- #bitnami-banner {display:none;}
This method is working only on your present theme which you are using. If you change your theme then the bitnami banner again showing on the right corner of your website. So if you want to disable the bitnami banner permanently then follow the SSH server method which is given above.
If your problem will solve by this tutorial then, please give your feedback in comment section below |